

OpenAI Chat Completion API Application and Usage
OpenAI ChatGPT is a very powerful AI conversational system. Simply by entering a prompt, it can generate fluent and natural responses in just a few seconds. ChatGPT stands out in the industry with its excellent language understanding and generation capabilities. Today, ChatGPT has long been widely used across various industries and fields, and its influence is becoming increasingly significant. Whether for daily conversations, creative writing, professional consultation, or code programming, ChatGPT can provide astonishing intelligent assistance, greatly improving human work efficiency and creativity.
This document mainly introduces the usage process of OpenAI Chat Completion API operations. With it, we can easily use the conversation features of official OpenAI ChatGPT.
¶ GPT-6.1 Sol
Use model: "gpt-6.1-sol" to select this model. It supports streaming output, function calling, structured output, and image input. During the first week of availability, it is only available to verified ACE T1+ holders (at least 100,000 ACE) or authorized users; the specific availability time is subject to the console access prompt.
Reasoning levels support low, medium, high, xhigh, and max, while none or minimal are not currently supported. It is recommended to start with reasoning_effort: "low". When the input exceeds 272,000 tokens, long-context pricing applies to the entire request, and fees are subject to the current console pricing.
¶ Application Process
To use the OpenAI Chat Completion API, first go to the qiyaov Console to obtain your API Token and keep it as a backup.

If you have not yet logged in or registered, you will be automatically redirected to the login page and invited to register and log in. After completion, you will automatically return to the current page.
One API Token can call all platform services; there is no need to apply separately for each service. The first application will include free credits for a free trial; when credits are insufficient, you can recharge your general balance in the console.
📘 Full documentation: OpenAI Chat Completion API →
¶ Basic Usage
Next, you can fill in the corresponding content in the interface, as shown in the image:
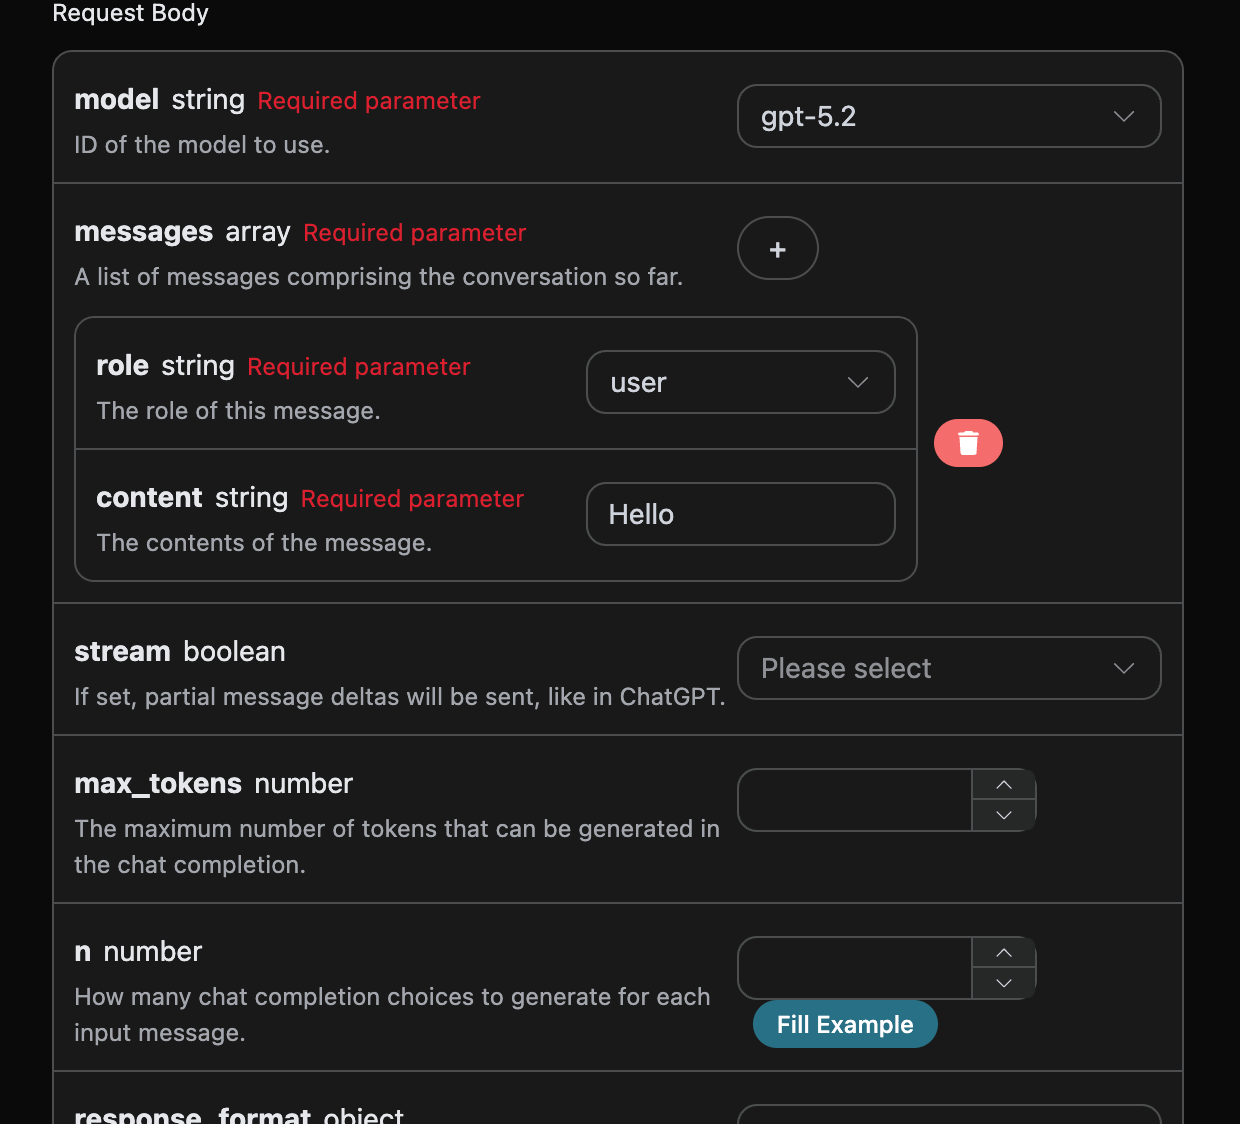
When using this API for the first time, we need to fill in at least three items. One is authorization, which can be selected directly from the dropdown list. Another parameter is model; model is the model category from the official OpenAI ChatGPT website that we choose to use. Here, we mainly have 20 models, and details can be viewed in the models we provide. The last parameter is messages; messages is the array of prompt words we enter. It is an array, indicating that multiple prompt words can be uploaded at the same time. Each prompt word includes role and content, where role represents the role of the questioner. We provide three identities: user, assistant, and system. The other one, content, is the specific content of our question.
At the same time, you can notice that there is corresponding generated calling code on the right. You can copy the code and run it directly, or directly click the “Try” button for testing.
Common optional parameters:
max_tokens: Limits the maximum number of tokens in a single response.temperature: Generation randomness, between 0 and 2. The larger the value, the more divergent it is.n: How many candidate responses are generated at once.response_format: Return format settings.
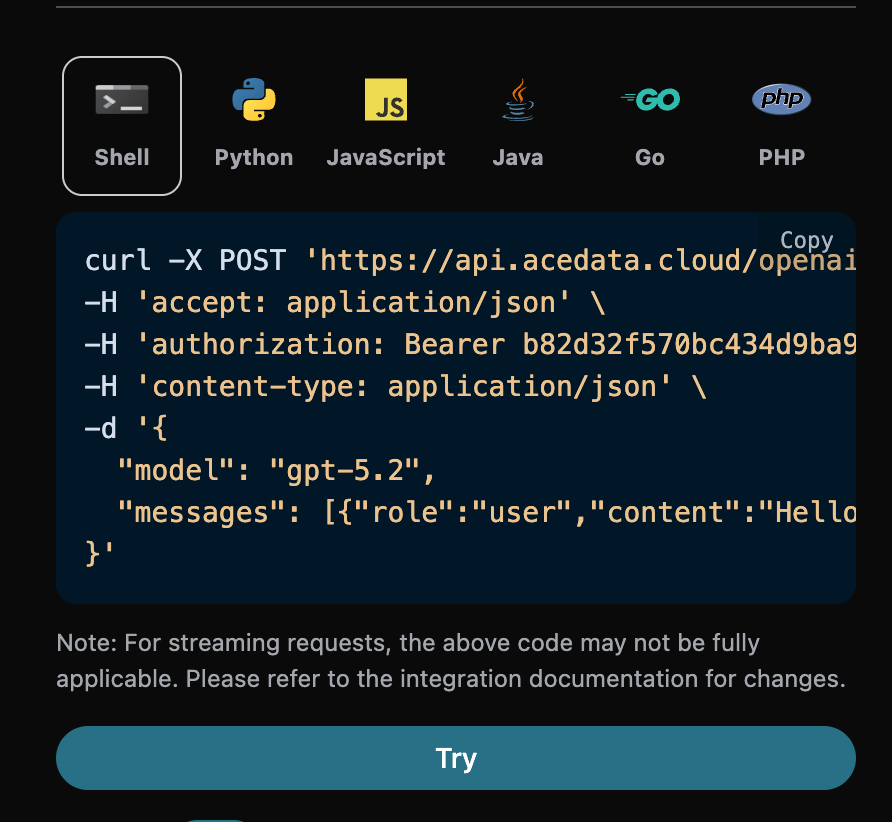
After calling it, we find that the returned result is as follows:
{
  "id": "chatcmpl-Cmd6uwSxN75F4PAdQSFEO8f2QPs4E",
  "object": "chat.completion",
  "created": 1765706120,
  "model": "gpt-5.5",
  "choices": [
    {
      "index": 0,
      "message": {
        "role": "assistant",
        "content": "Hello! What can I help you with today?",
        "refusal": null,
        "annotations": []
      },
      "finish_reason": "stop"
    }
  ],
  "usage": {
    "prompt_tokens": 7,
    "completion_tokens": 13,
    "total_tokens": 20,
    "prompt_tokens_details": {
      "cached_tokens": 0,
      "audio_tokens": 0
    },
    "completion_tokens_details": {
      "reasoning_tokens": 0,
      "audio_tokens": 0,
      "accepted_prediction_tokens": 0,
      "rejected_prediction_tokens": 0
    }
  },
  "service_tier": "default",
  "system_fingerprint": null
}
The returned result contains multiple fields, introduced as follows:
id, the ID generated for this conversation task, used to uniquely identify this conversation task.model, the selected model from the official OpenAI ChatGPT website.choices, the response information provided by ChatGPT for the prompt words.usage: statistical information about tokens for this question-and-answer session.
Among them, choices contains ChatGPT's response information. The choices inside it is ChatGPT, as can be seen in the image.
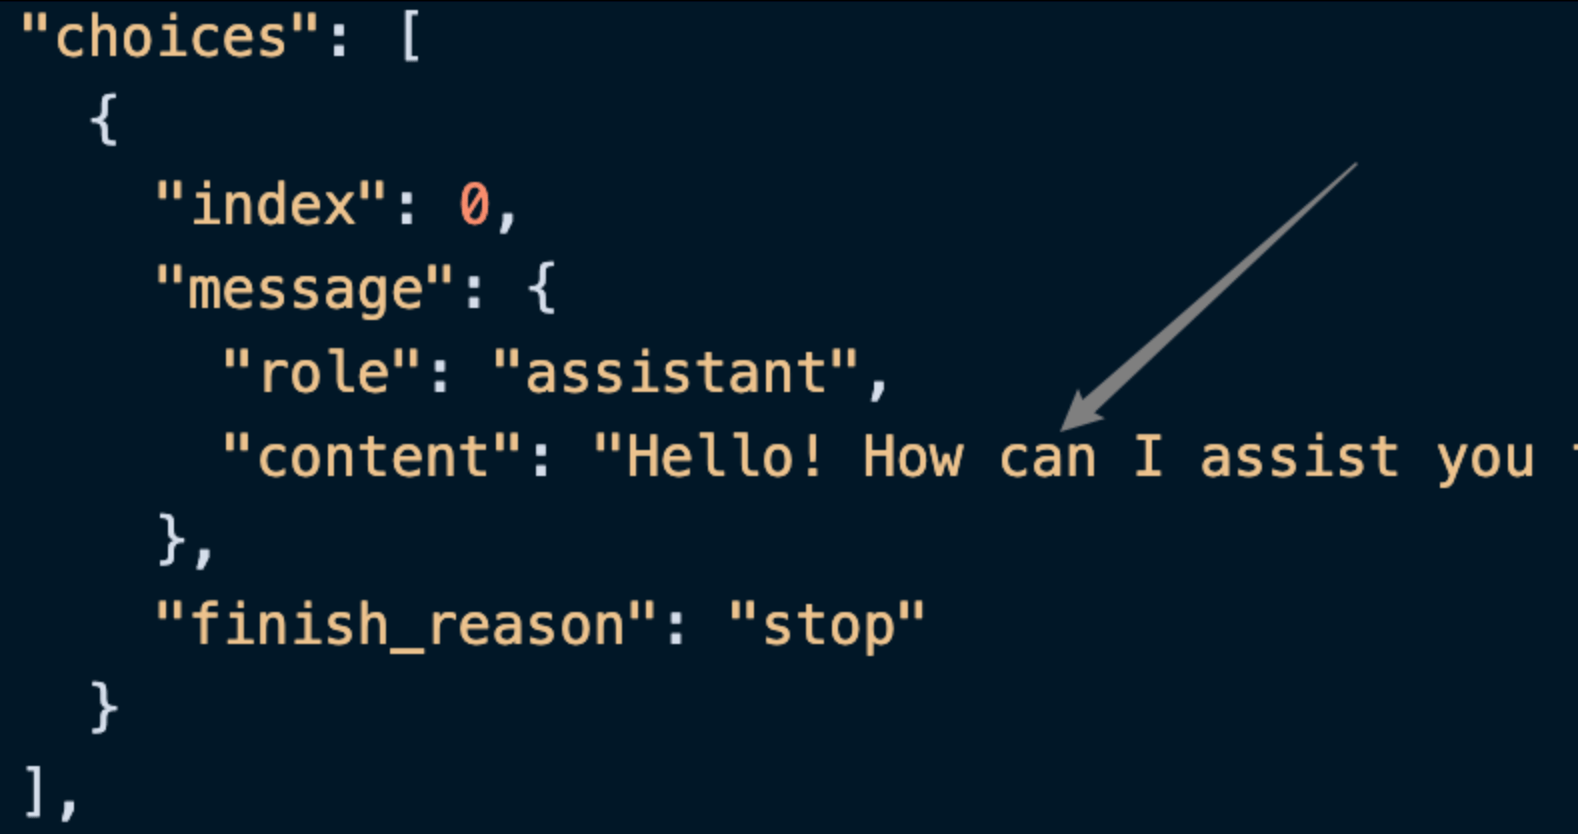
It can be seen that the content field inside choices contains the specific content of the ChatGPT response.
¶ Streaming Response
This API also supports streaming responses, which is very useful for web integration and can enable a webpage to achieve a word-by-word display effect.
If you want to return a response through streaming, you can change the stream parameter in the request header to true.
The modification is shown in the image, but the calling code needs corresponding changes to support streaming responses.
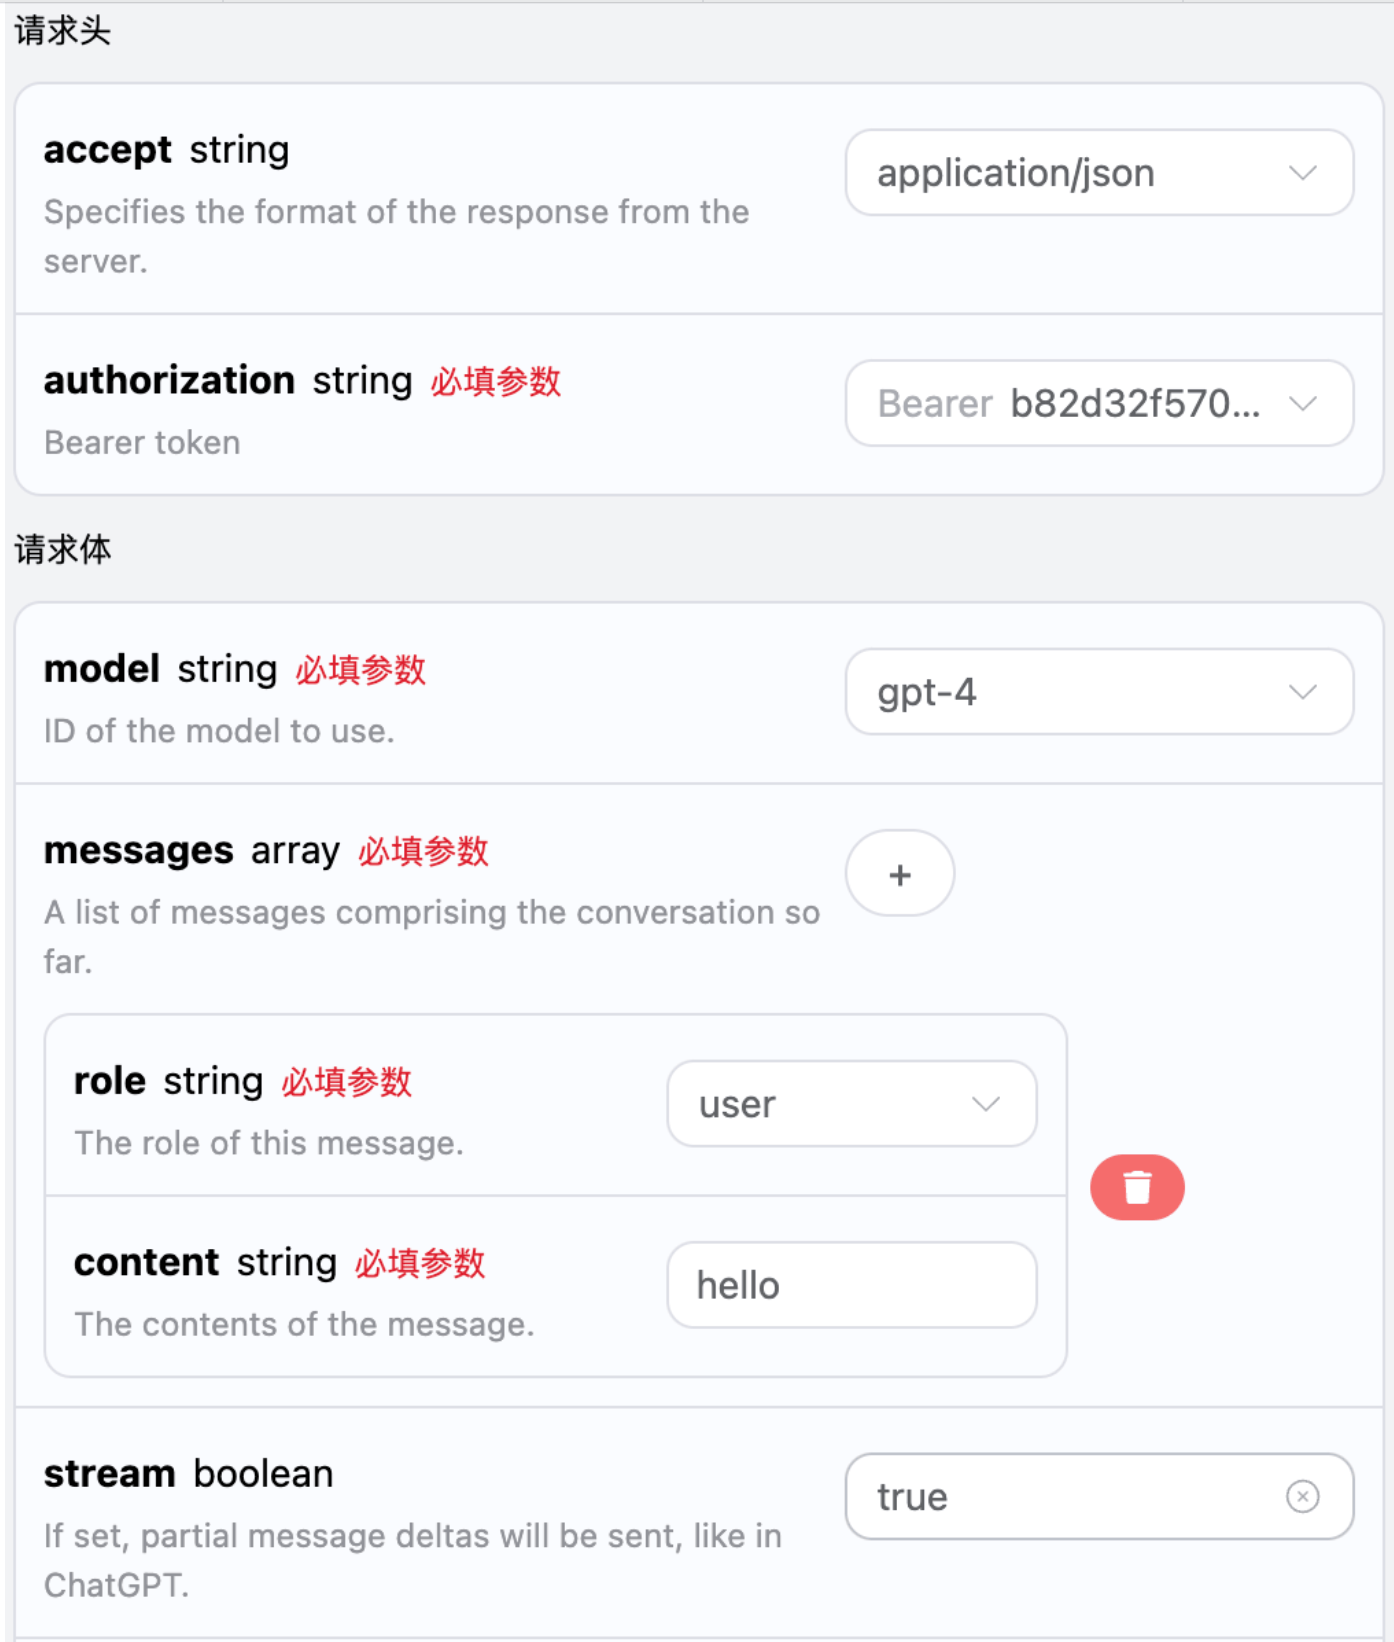
After changing stream to true, the API will return the corresponding JSON data line by line. At the code level, we need to make corresponding changes to obtain the line-by-line results.
Python sample calling code:
import requests

url = "https://api.qiyaov.com/openai/chat/completions"

headers = {
    "accept": "application/json",
    "authorization": "Bearer {token}",
    "content-type": "application/json"
}

payload = {
    "model": "gpt-4",
    "messages": [{"role":"user","content":"hello"}],
    "stream": True
}

response = requests.post(url, json=payload, headers=headers)
print(response.text)
The output effect is as follows:
data: {"choices": [{"delta": {"role": "assistant"}, "index": 0}], "created": 1721007348, "id": "chatcmpl-YzczYjVhNjhjMzMwNDQ5MDkyNGYzOGZjZGE1ZGQ5OGU", "model": "gpt-4", "object": "chat.completion.chunk", "recipient": "all"}

data: {"choices": [{"delta": {"content": "Hi", "role": "assistant"}, "index": 0}], "created": 1721007348, "id": "chatcmpl-YzczYjVhNjhjMzMwNDQ5MDkyNGYzOGZjZGE1ZGQ5OGU", "model": "gpt-4", "object": "chat.completion.chunk", "recipient": "all"}

data: {"choices": [{"delta": {"content": " there", "role": "assistant"}, "index": 0}], "created": 1721007348, "id": "chatcmpl-YzczYjVhNjhjMzMwNDQ5MDkyNGYzOGZjZGE1ZGQ5OGU", "model": "gpt-4", "object": "chat.completion.chunk", "recipient": "all"}

data: {"choices": [{"delta": {"content": "!", "role": "assistant"}, "index": 0}], "created": 1721007348, "id": "chatcmpl-YzczYjVhNjhjMzMwNDQ5MDkyNGYzOGZjZGE1ZGQ5OGU", "model": "gpt-4", "object": "chat.completion.chunk", "recipient": "all"}

data: {"choices": [{"delta": {"content": " How", "role": "assistant"}, "index": 0}], "created": 1721007348, "id": "chatcmpl-YzczYjVhNjhjMzMwNDQ5MDkyNGYzOGZjZGE1ZGQ5OGU", "model": "gpt-4", "object": "chat.completion.chunk", "recipient": "all"}

data: {"choices": [{"delta": {"content": " can", "role": "assistant"}, "index": 0}], "created": 1721007348, "id": "chatcmpl-YzczYjVhNjhjMzMwNDQ5MDkyNGYzOGZjZGE1ZGQ5OGU", "model": "gpt-4", "object": "chat.completion.chunk", "recipient": "all"}

data: {"choices": [{"delta": {"content": " I", "role": "assistant"}, "index": 0}], "created": 1721007348, "id": "chatcmpl-YzczYjVhNjhjMzMwNDQ5MDkyNGYzOGZjZGE1ZGQ5OGU", "model": "gpt-4", "object": "chat.completion.chunk", "recipient": "all"}

data: {"choices": [{"delta": {"content": " assist", "role": "assistant"}, "index": 0}], "created": 1721007348, "id": "chatcmpl-YzczYjVhNjhjMzMwNDQ5MDkyNGYzOGZjZGE1ZGQ5OGU", "model": "gpt-4", "object": "chat.completion.chunk", "recipient": "all"}

data: {"choices": [{"delta": {"content": " you", "role": "assistant"}, "index": 0}], "created": 1721007348, "id": "chatcmpl-YzczYjVhNjhjMzMwNDQ5MDkyNGYzOGZjZGE1ZGQ5OGU", "model": "gpt-4", "object": "chat.completion.chunk", "recipient": "all"}

data: {"choices": [{"delta": {"content": " today", "role": "assistant"}, "index": 0}], "created": 1721007348, "id": "chatcmpl-YzczYjVhNjhjMzMwNDQ5MDkyNGYzOGZjZGE1ZGQ5OGU", "model": "gpt-4", "object": "chat.completion.chunk", "recipient": "all"}

data: {"choices": [{"delta": {"content": "?", "role": "assistant"}, "index": 0}], "created": 1721007348, "id": "chatcmpl-YzczYjVhNjhjMzMwNDQ5MDkyNGYzOGZjZGE1ZGQ5OGU", "model": "gpt-4", "object": "chat.completion.chunk", "recipient": "all"}

data: {"choices": [{"delta": {"role": "assistant"}, "index": 0}], "created": 1721007348, "id": "chatcmpl-YzczYjVhNjhjMzMwNDQ5MDkyNGYzOGZjZGE1ZGQ5OGU", "model": "gpt-4", "object": "chat.completion.chunk", "recipient": "all"}

data: {"choices": [{"delta": {"role": "assistant"}, "finish_reason": "stop", "index": 0}], "created": 1721007349, "id": "chatcmpl-YzczYjVhNjhjMzMwNDQ5MDkyNGYzOGZjZGE1ZGQ5OGU", "model": "gpt-4", "object": "chat.completion.chunk", "recipient": "all"}

data: [DONE]
As you can see, there are many data entries in the response. The choices within data are the latest response content, which is consistent with the content introduced above. choices contains the newly added response content, and you can integrate it into your system based on the results. Meanwhile, the end of the streaming response is determined based on the content of data. If the content is [DONE], it indicates that the streaming response has completely ended. The returned data result contains multiple fields, introduced as follows:
id, the ID generated for this conversation task, used to uniquely identify this conversation task.model, the selected model from the official OpenAI ChatGPT website.choices, the response information provided by ChatGPT for the prompt.
JavaScript is also supported. For example, the streaming invocation code for Node.js is as follows:
const options = {
  method: "post",
  headers: {
    accept: "application/json",
    authorization: "Bearer {token}",
    "content-type": "application/json",
  },
  body: JSON.stringify({
    model: "gpt-4",
    messages: [{ role: "user", content: "hello" }],
    stream: true,
  }),
};

fetch("https://api.qiyaov.com/openai/chat/completions", options)
  .then((response) => response.json())
  .then((response) => console.log(response))
  .catch((err) => console.error(err));
Java sample code:
JSONObject jsonObject = new JSONObject();
jsonObject.put("model", "gpt-4");
jsonObject.put("messages", [{"role":"user","content":"hello"}]);
jsonObject.put("stream", true);
MediaType mediaType = "application/json; charset=utf-8".toMediaType();
RequestBody body = jsonObject.toString().toRequestBody(mediaType);
Request request = new Request.Builder()
  .url("https://api.qiyaov.com/openai/chat/completions")
  .post(body)
  .addHeader("accept", "application/json")
  .addHeader("authorization", "Bearer {token}")
  .addHeader("content-type", "application/json")
  .build();

OkHttpClient client = new OkHttpClient();
Response response = client.newCall(request).execute();
System.out.print(response.body!!.string())
Other languages can be adapted separately. The principle is the same.
¶ Multi-turn Conversations
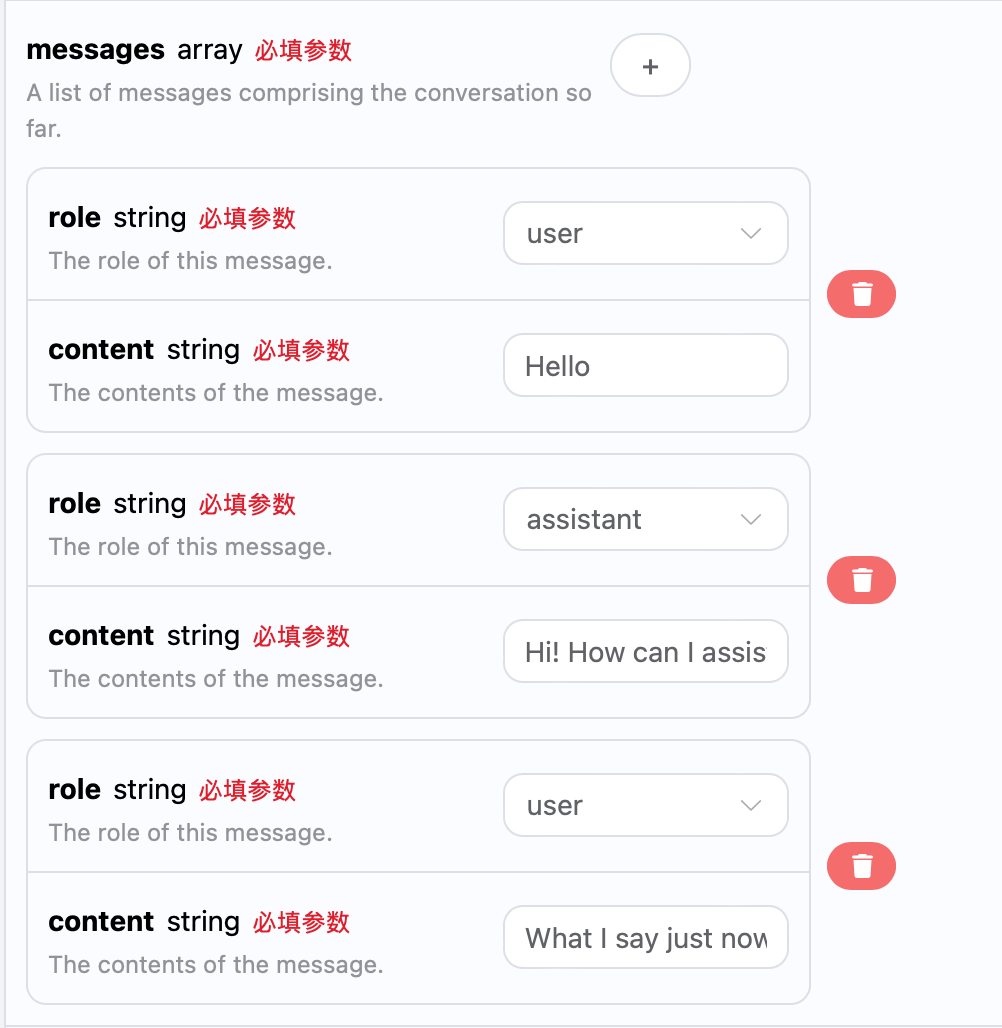
If you want to integrate multi-turn conversation functionality, you need to upload multiple prompts in the messages field. A specific example of multiple prompts is shown in the figure below:
Python sample invocation code:
import requests

url = "https://api.qiyaov.com/openai/chat/completions"

headers = {
    "accept": "application/json",
    "authorization": "Bearer {token}",
    "content-type": "application/json"
}

payload = {
    "model": "gpt-4",
    "messages": [{"role":"user","content":"Hello"},{"role":"assistant","content":"Hi! How can I assist you today?"},{"role":"user","content":"What I say just now?"}]
}

response = requests.post(url, json=payload, headers=headers)
print(response.text)
By uploading multiple prompts, multi-turn conversations can be easily implemented, and the following response can be obtained:
{
  "choices": [
    {
      "index": 0,
      "message": {
        "role": "assistant",
        "content": "You said, \"Hello.\""
      },
      "finish_reason": "stop"
    }
  ],
  "created": 1721323012,
  "id": "chatcmpl-NWZmOTA5MDlkZjBjNDRjNGEwMzRjYzA5NmM1MzQwMWY",
  "model": "gpt-4",
  "object": "chat.completion.chunk",
  "recipient": "all",
  "usage": {
    "prompt_tokens": 31,
    "completion_tokens": 6,
    "total_tokens": 37
  }
}
It can be seen that the information contained in choices is consistent with the basic usage content. This contains the specific content of ChatGPT's responses to multiple conversations, so corresponding questions can be answered based on multiple conversation contents.
¶ Integrating with OpenAI-Python
The OpenAI Chat Completion API is compatible with the official OpenAI interface and can be directly integrated using the official SDK OpenAI-Python. This article will briefly introduce how to use it.
- First, you need to set up a local
Pythonenvironment. You can search Google for this process. - Download and install a development environment, such as the VSCode editor.
- Configure the
OpenAIenvironment variables.
- In the project folder, create and save a file named
.env .envfile content:
OPENAI_API_KEY="sk-xxx"
OPENAI_BASE_URL="https://api.qiyaov.com/openai"  # Reminder again: If you use an official OpenAI key, do not use this address.
Replace sk-xxx with your own key. OPENAI_BASE_URL is the proxy interface for accessing OpenAI.
- Install the packages required by the project
pip install openai
The command on Mac OS is:
pip3 install openai
- Create a sample source code file
Assume that we have created a sample code file index.py, with the specific content as follows:
import os
from openai import OpenAI

client = OpenAI(api_key=os.environ.get("OPENAI_API_KEY"))

response = client.chat.completions.create(
    messages=[
        {
            "role": "user",
            "content": "hello",
        }
    ],
    model="gpt-4",
)

print(response.text)
¶ Browsing Models
The gpt-3.5-browsing and gpt-4-browsing models are different from other models. They can perform web searches based on prompts and return appropriately adjusted web search results to you. This article will demonstrate the browsing feature through a specific example. Next, you can fill in the corresponding content on the OpenAI Chat Completion API page, as shown in the image:
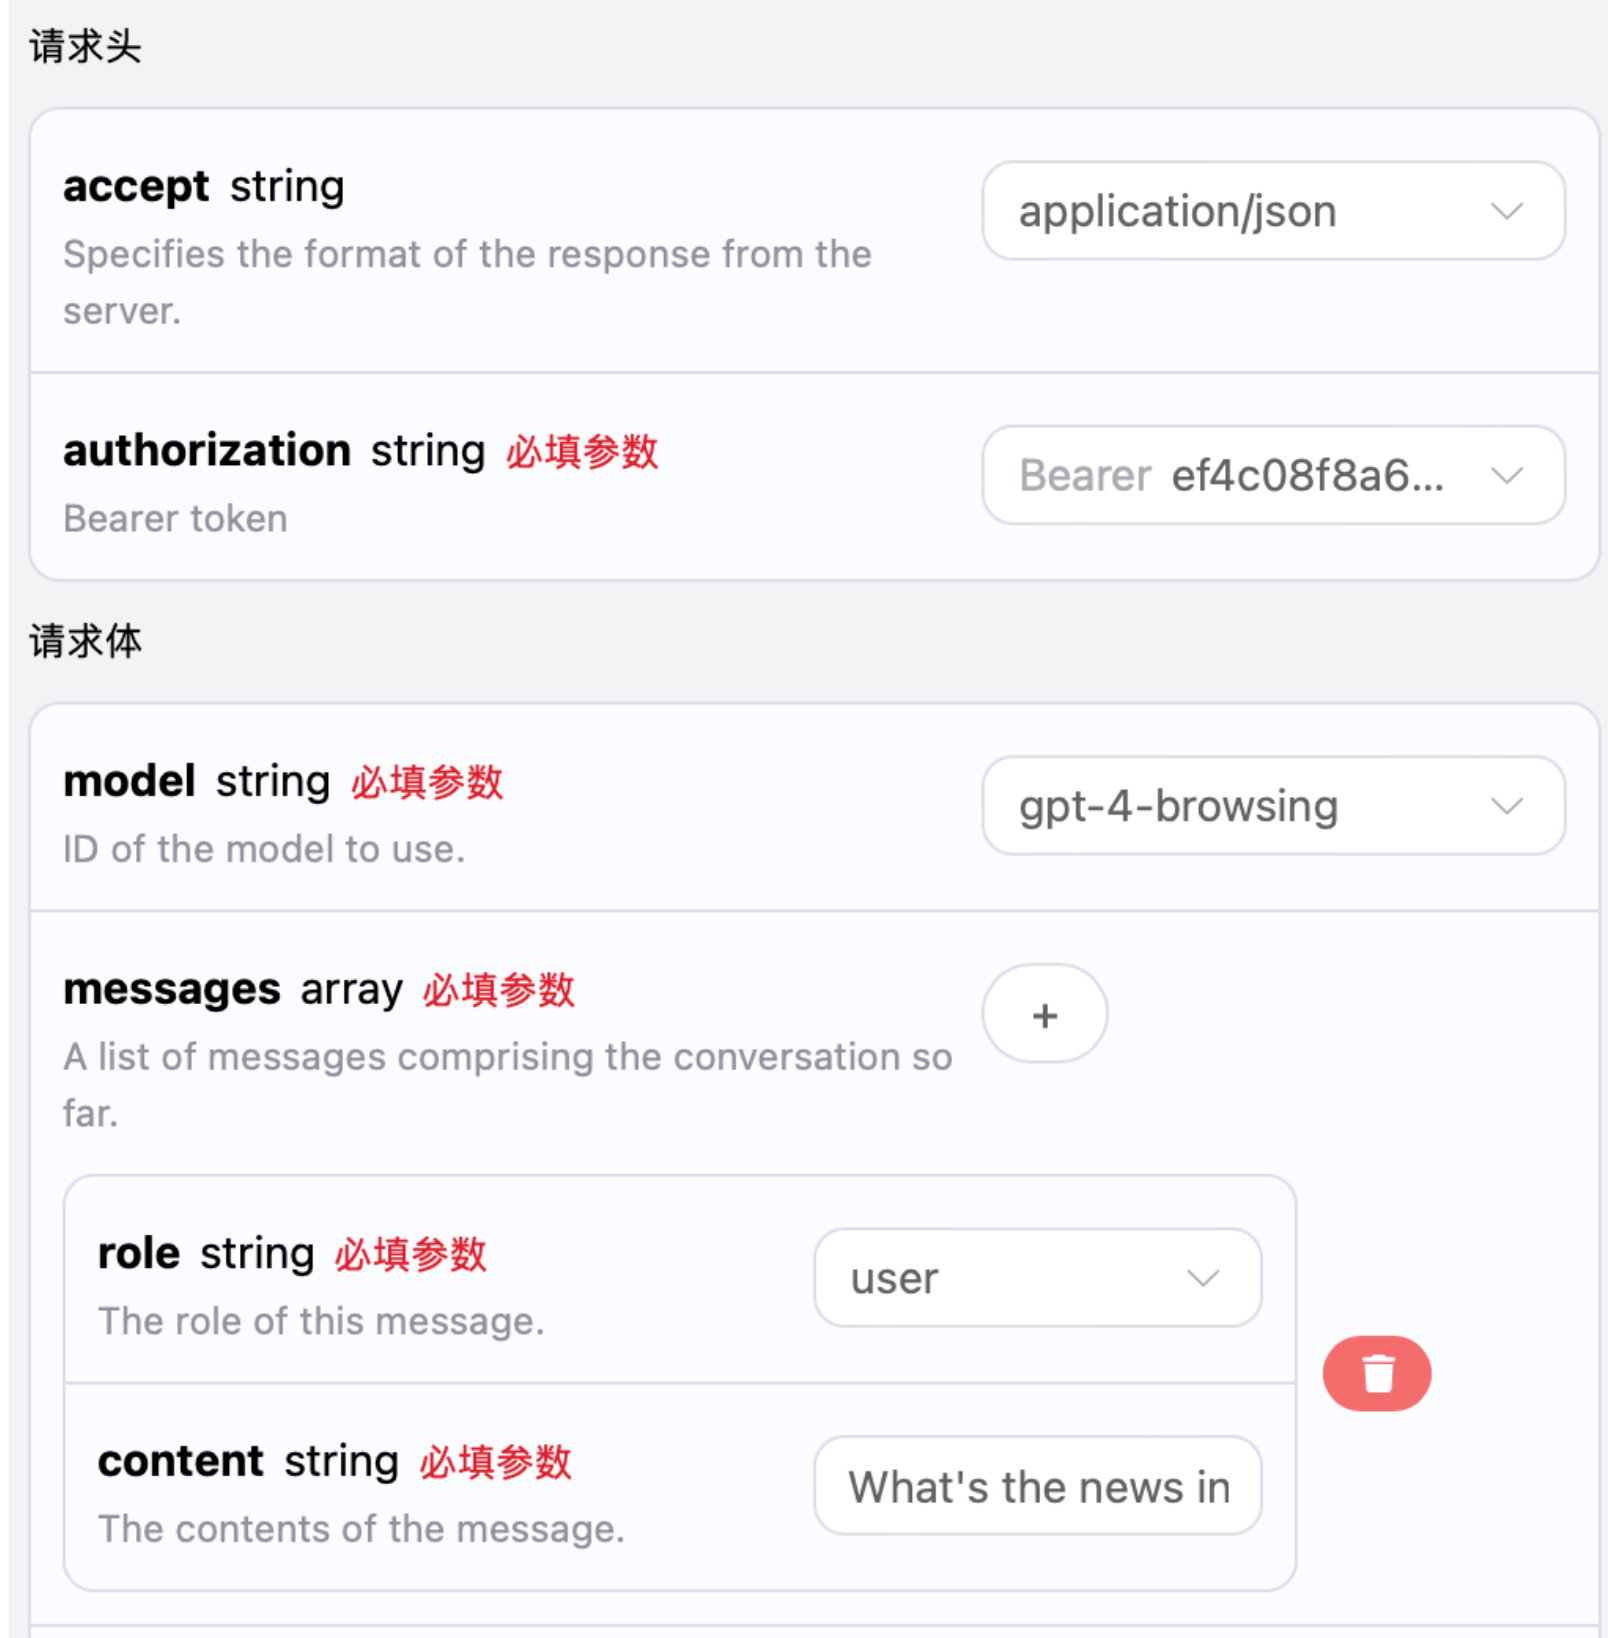
At the same time, you can notice that there is corresponding generated call code on the right. You can copy the code and run it directly, or click the "Try" button directly for testing.
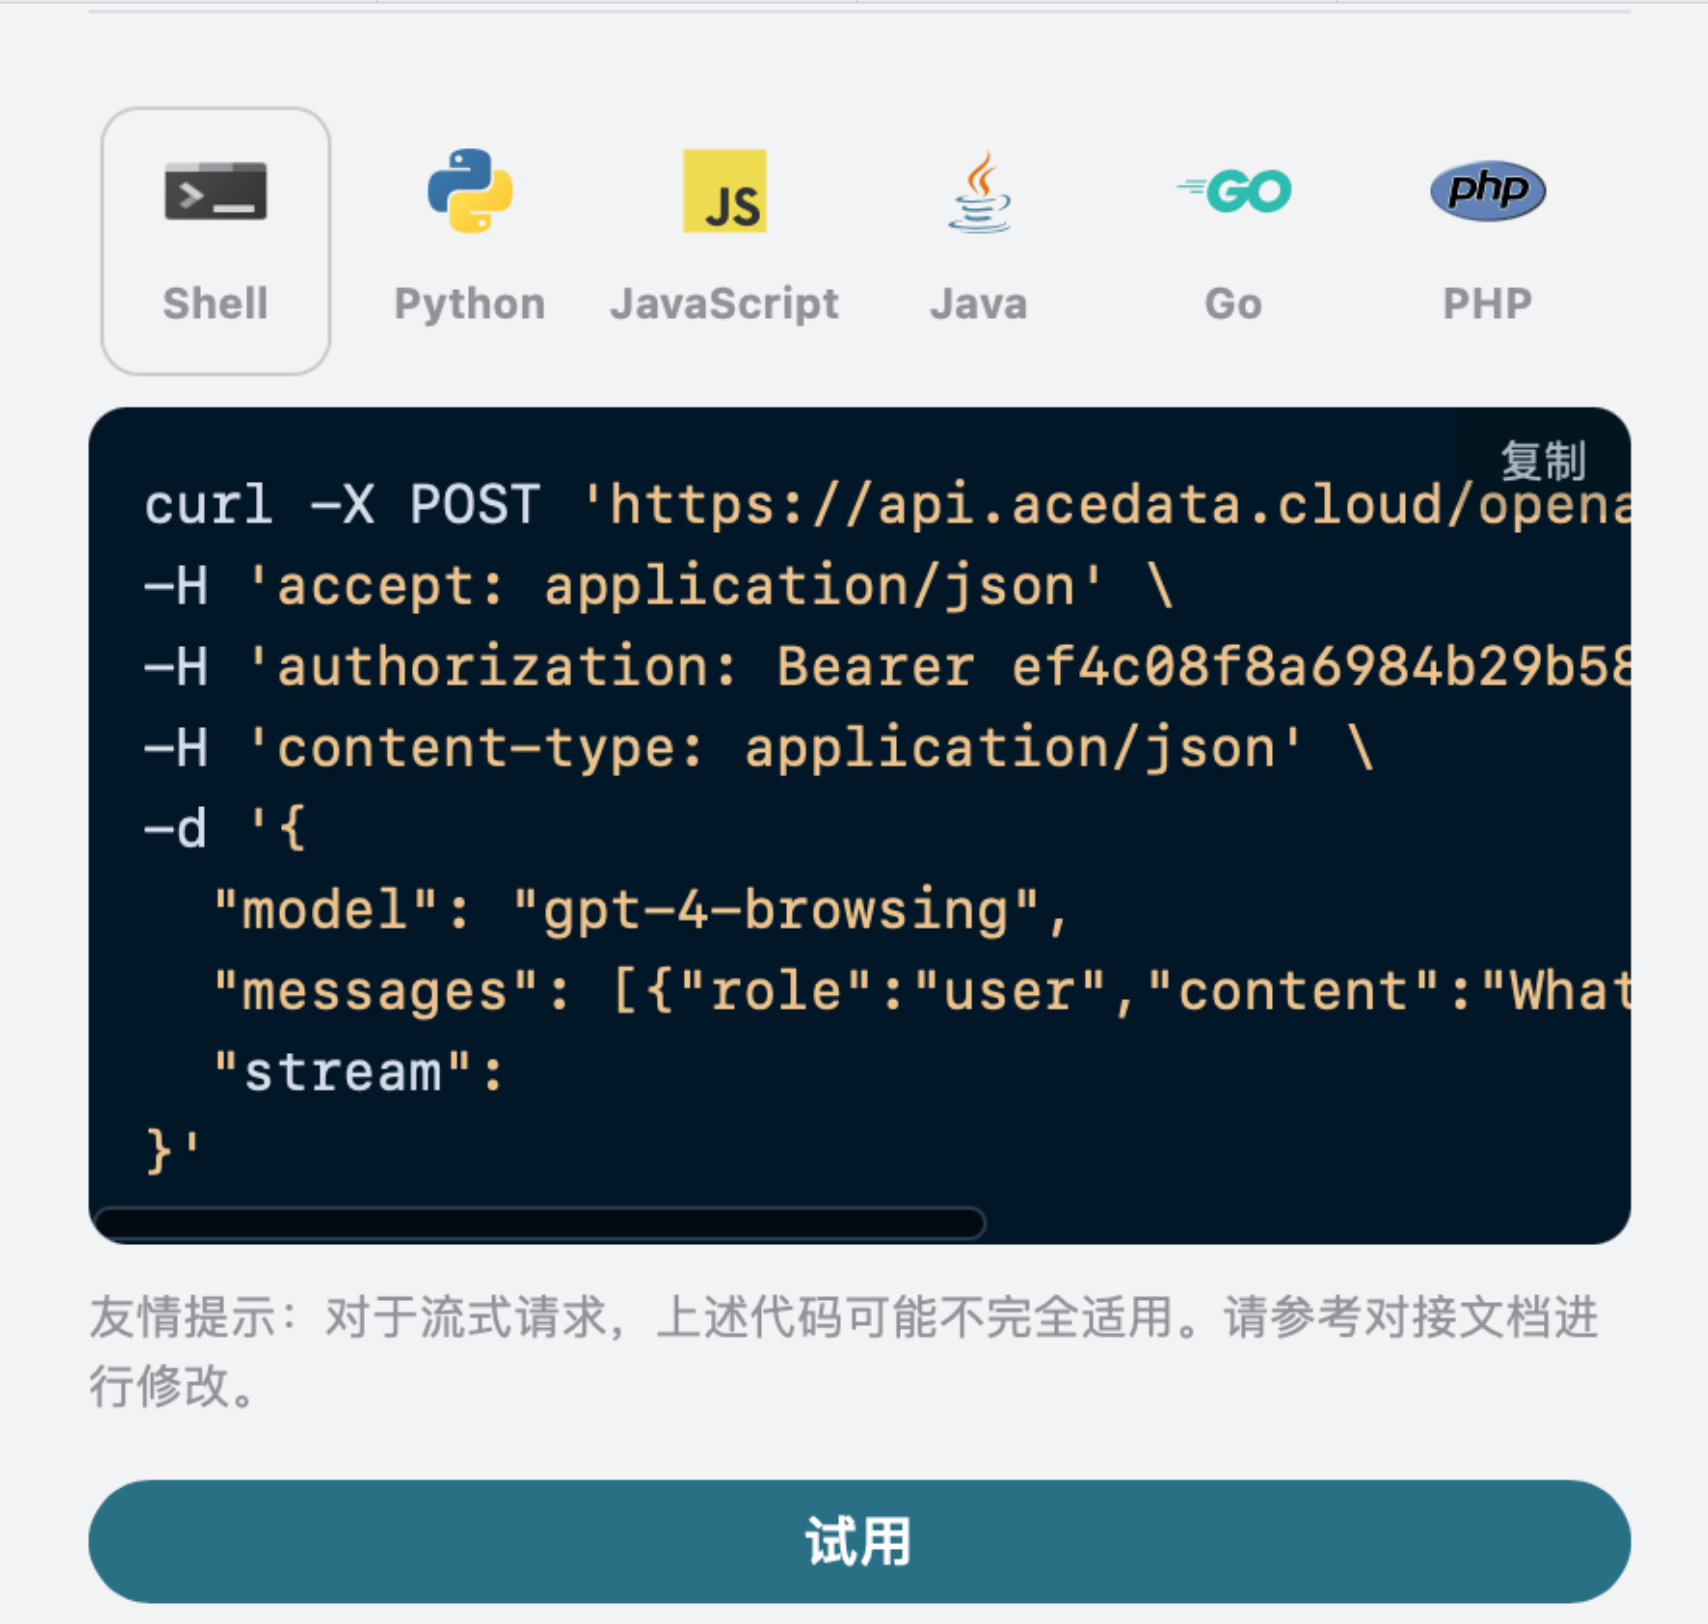
After the call, we find that the returned result is as follows:
{
  "choices": [
    {
      "index": 0,
      "message": {
        "role": "assistant",
        "content": "For the latest news in China today, you can check major news websites such as:\n\n- [BBC News China](https://www.bbc.com/news/world/asia/china)\n- [CNN China News](https://edition.cnn.com/china)\n- [Reuters China](https://www.reuters.com/news/archive/china-news)\n\nThese sources will have up-to-date information on current events in China."
      },
      "finish_reason": "stop"
    }
  ],
  "created": 1721009347,
  "id": "chatcmpl-YzA0M2RjZDVkYThlNDkxNTkzOThmZWQ4OGMzNzdhNzA",
  "model": "gpt-4-browsing",
  "object": "chat.completion.chunk",
  "recipient": "all",
  "usage": {
    "prompt_tokens": 325,
    "completion_tokens": 82,
    "total_tokens": 407
  }
}
It can be seen that the response information in choices is obtained through web queries, and relevant links are also provided. The response information in choices needs to be rendered using markdown syntax to obtain the best experience. Finally, this also demonstrates the powerful advantage of our model's web browsing capability.
¶ Vision Models
gpt-4o is a multimodal large language model developed by OpenAI. It adds visual understanding capabilities on the basis of GPT-4. This model can process both text and image inputs simultaneously, enabling cross-modal understanding and generation.
The text processing of the gpt-4o model is consistent with the basic usage content above. The following will briefly introduce how to use the model's image processing capabilities.
The image processing capability of the gpt-4o model is mainly used by adding a type field to the original content content. Through this field, it can determine whether text or an image is uploaded, thereby using the image processing capability of the gpt-4o model. The following mainly describes how to call this feature using Curl and Python.
- Curl script method
curl -X POST 'https://api.qiyaov.com/openai/chat/completions' \
-H 'accept: application/json' \
-H 'authorization: Bearer {token}' \
-H 'content-type: application/json' \
-d '{
    "model": "gpt-4o",
    "messages": [
      {
        "role": "user",
        "content": [
          {
            "type": "text",
            "text": "What'\''s in this image?"
          },
          {
            "type": "image_url",
            "image_url": {
              "url": "https://upload.wikimedia.org/wikipedia/commons/thumb/d/dd/Gfp-wisconsin-madison-the-nature-boardwalk.jpg/2560px-Gfp-wisconsin-madison-the-nature-boardwalk.jpg"
            }
          }
        ]
      }
    ]
  }'
- Python script method
import requests

url = "https://api.qiyaov.com/openai/chat/completions"

headers = {
    "accept": "application/json",
    "authorization": "Bearer {token}",
    "content-type": "application/json"
}

payload = {
    "model": "gpt-4o",
    "messages": [
        {
            "role": "user",
            "content": [
                {
                    "type": "text", "text": "What's in this image?"
                },
                {
                    "type": "image_url",
                    "image_url": {
                        "url": "https://upload.wikimedia.org/wikipedia/commons/thumb/d/dd/Gfp-wisconsin-madison-the-nature-boardwalk.jpg/2560px-Gfp-wisconsin-madison-the-nature-boardwalk.jpg"
                    }
                },
            ],
        }
    ]
}

response = requests.post(url, json=payload, headers=headers)
print(response.text)
Then you can get the following result. The field information in the result is consistent with the above. The specific details are as follows:
{
  "id": "chatcmpl-123",
  "object": "chat.completion",
  "created": 1677652288,
  "model": "gpt-4-vision-preview",
  "system_fingerprint": "fp_44709d6fcb",
  "choices": [
    {
      "index": 0,
      "message": {
        "role": "assistant",
        "content": "\n\nThis image shows a wooden boardwalk extending through a lush green marshland."
      },
      "logprobs": null,
      "finish_reason": "stop"
    }
  ],
  "usage": {
    "prompt_tokens": 9,
    "completion_tokens": 12,
    "total_tokens": 21
  }
}
It can be seen that the response content is based on the image. Therefore, through the above two methods, you can easily use the text and image processing capabilities of the gpt-4-vision model.
In addition to gpt-4o, there is also a lower-cost model called gpt-4o-mini. gpt-4o-mini is the latest generation large language model developed by OpenAI. It not only responds quickly, but is also cheaper, and supports multimodality as well. For the use of the vision feature, refer to the usage content of the gpt-4o model above.
¶ GPT-4o Image Generation Model
¶ Generating Images Based on Reference Images
Below is an example of generating an image in a custom style based on an image. First, let us look at the image we input, as shown below:

It can be seen that the reference image is an image of a real person. We can make it change into a different style, for example, turning it into an anime-style image. The specific request example is:
{
  "model": "gpt-4o-image",
  "messages": [
    {
      "role": "user",
      "content": [
        {
          "type": "text",
          "text": "生成动漫风格的图片,并且带上个帽子"
        },
        {
          "type": "image_url",
          "image_url": {
            "url": "https://cdn.acedata.cloud/qzx2z1.png"
          }
        }
      ]
    }
  ],
  "stream": false
}
Example result:
{
"id": "chatcmpl-89DPQxbLuyRNzH5YLCPYM5WElV3dm",
"object": "chat.completion",
"created": 1781020664,
"model": "gpt-4o-image",
"choices": [
{
"index": 0,
"message": {
"role": "assistant",
"content": "\n\n> 🎨 生成中...\n\n\n\n[点击下载](https://platform.cdn.acedata.cloud/download/20260609/0f7b6cf1b14843b1bab8e261fe5765b3.png)"
},
"logprobs": null,
"finish_reason": "stop"
}
],
"usage": {
"prompt_tokens": 100,
"completion_tokens": 122,
"total_tokens": 222,
"prompt_tokens_details": {
"text_tokens": 93,
"cached_tokens_details": {}
},
"completion_tokens_details": {}
}
}
Among them, message.content in choices is the complete generated conversation result, with the image included in Markdown format (the image link is a temporary address, please download and save it promptly). It can be seen that the generated image is indeed in an anime style, as specifically shown in the image below:

¶ Text-to-Image Generation Only
We can use a prompt to make it generate an image and return it to us in a conversational result. Below, we use 创建一张未来城市日落的图片 as an example. The specific example is as follows:
{
  "model": "gpt-4o-image",
  "messages": [
    {
      "role": "user",
      "content": [
        {
          "type": "text",
          "text": "创建一张未来城市日落的图片"
        }
      ]
    }
  ],
  "stream": false
}
Example result:
{
"id": "chatcmpl-89DqkpQoPGkQqJ6kPKMKWejjLXVxQ",
"object": "chat.completion",
"created": 1781020587,
"model": "gpt-4o-image",
"choices": [
{
"index": 0,
"message": {
"role": "assistant",
"content": "\n\n> 🎨 生成中...\n\n\n\n[点击下载](https://platform.cdn.acedata.cloud/download/20260609/ed2cca68732540fc99162ddc10ddc153.png)"
},
"logprobs": null,
"finish_reason": "stop"
}
],
"usage": {
"prompt_tokens": 17,
"completion_tokens": 104,
"total_tokens": 121,
"prompt_tokens_details": {
"text_tokens": 10,
"cached_tokens_details": {}
},
"completion_tokens_details": {}
}
}
It can be seen that the result matches the prompt, as specifically shown below:

¶ Generating One Image from Multiple Images
We can also use multiple reference images to generate one image. For example, using an image of a handsome man and an image of coffee, these two images can be used to generate an image of a handsome man drinking coffee. Below are the specific reference images:


Below, we use 生成男生举着咖啡,并且马上要喝的样子 as an example. The specific example is as follows:
{
  "model": "gpt-4o-image",
  "messages": [
    {
      "role": "user",
      "content": [
        {
          "type": "text",
          "text": "Generate an image of a man holding coffee and about to drink it"
        },
        {
          "type": "image_url",
          "image_url": {
            "url": "https://cdn.acedata.cloud/pqquv3.jpg"
          }
        },
        {
          "type": "image_url",
          "image_url": {
            "url": "https://cdn.acedata.cloud/h8j2i0.jpg"
          }
        }
      ]
    }
  ],
  "stream": false
}
Sample result:
{
"id": "chatcmpl-89DnHbbzOIQvU1VzJrNjzMU8BRUgG",
"object": "chat.completion",
"created": 1781021018,
"model": "gpt-4o-image",
"choices": [
{
"index": 0,
"message": {
"role": "assistant",
"content": "\n\n> 🎨 Generating...\n\n\n\n[Click to download](https://platform.cdn.acedata.cloud/download/20260610/f1d9ddee3c304230a9f92929f04b95be.png)"
},
"logprobs": null,
"finish_reason": "stop"
}
],
"usage": {
"prompt_tokens": 193,
"completion_tokens": 116,
"total_tokens": 309,
"prompt_tokens_details": {
"text_tokens": 186,
"cached_tokens_details": {}
},
"completion_tokens_details": {}
}
}
As you can see, the generated result indeed combines the two images to generate a new image. Below is the specific result:

¶ Error Handling
When calling the API, if an error occurs, the API will return the corresponding error code and information. For example:
400 token_mismatched: Bad request, possibly due to missing or invalid parameters.400 api_not_implemented: Bad request, possibly due to missing or invalid parameters.401 invalid_token: Unauthorized, invalid or missing authorization token.429 too_many_requests: Too many requests, you have exceeded the rate limit.500 api_error: Internal server error, something went wrong on the server.
¶ Error Response Example
{
  "success": false,
  "error": {
    "code": "api_error",
    "message": "fetch failed"
  },
  "trace_id": "2cf86e86-22a4-46e1-ac2f-032c0f2a4e89"
}
¶ Conclusion
Through this document, you have learned how to easily implement the official OpenAI ChatGPT conversation feature using the OpenAI Chat Completion API. We hope this document can help you better integrate and use this API. If you have any questions, please feel free to contact our technical support team.